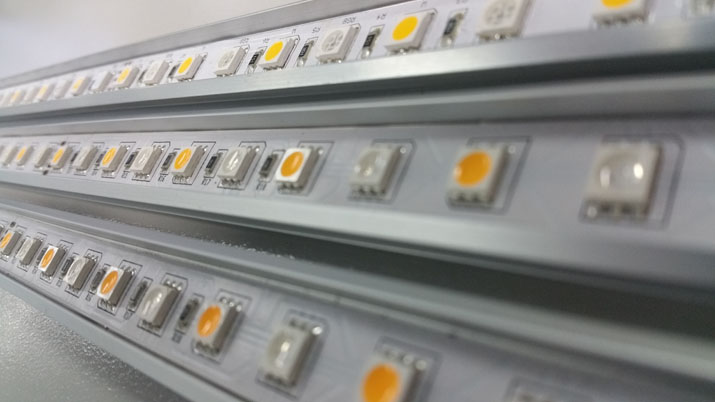
So, you’ve decided to install LED strip in your or your client’s latest project. With the advancements and developments in LED technology, LED strip is a fantastic option for a low profile, low cost, and low energy solution for a myriad of different applications.
Whether you’re highlighting a kitchen bench or showing off those bottles behind the bar, creating some impressive cove lighting in your ceiling or adding some useful task lighting to your wardrobe or cabinet, LED strip can really make your space “pop” without actually seeing the light source.
What could be so hard about LED strip?
Before heading out to grab a 5 metre roll of tape, slapping it onto a surface and plugging it in, there is a little more you should be aware of when considering to use LED strip.
The main question you will most likely be asking yourself is how much LED strip/tape will I need? Whilst it is certainly a very important question, there are many others factors you should take a look at first, such as:
- What am I lighting?
- How bright do I need the light to be?
- What is the surface and its area that needs to be lit?
- Will my light source be exposed to dust or water?
- Does the light need to be practical or decorative?
- What feel or mood am I going for?
All of these questions are very important when using LED strip. The strip’s power, brightness, colour or colour temperature, lensing and heat sinks will all depend on many or all of the answers to these questions.
What does all this mean?
By not being properly informed or not using someone that is knowledgeable in using and installing LED strip correctly you could run into a variety of problems. Selecting the wrong colour temperature could make your kitchen look like a hospital. Incorrectly calculating the heatsink required for your particular strip could result in a significantly shorter lifespan of the product or rendering it entirely useless.
So, let’s break down all of the important elements involved when selecting LED strip and hopefully you can get a better understanding and also making sure your project looks good, works well and lasts a long time.
Colour
Probably the first and most important decision you have to make when installing LED strip is: What colour do I want it to be?
If you are choosing a standard white, the colour temperature then becomes a factor (see below). If you want to get a bit colourful then there is the standard red, green or blue options.
Perhaps you don’t want a standard colour or even something in between or you would prefer a variety of colours. In that case, you should consider an RGB or even an RGBW LED strip solution, which combines the colour chips with a white chip to increase the hues available.
Colour Temperature
When lighting interior spaces with white LED strip, choosing the right colour temperature for the right application or task is very important, especially when considering mood, productivity and well-being. Measured in Kelvin, warmer colours or lower colour temperatures are generally used in living or public spaces to promote relaxation whilst cooler colours or higher colour temperatures are often used for task oriented applications or to promote concentration.
|
Kelvin Colour Temperature |
Associated Effects and Moods |
Appropriate Applications |
|---|---|---|
|
2700K |
Ambient |
Living/Family Rooms |
|
3000K |
Calm |
Living/Family Rooms |
|
4000K |
Precise |
Garage |
|
5000K |
Daylight |
Commercial |
|
6000K |
Daylight |
Commercial |
Lumens
Lumens are the measure of light that is emitted by a light source. Choosing an LED strip with a higher lumens value will provide you with more light for your project.
Colour Rendering Index
CRI or Colour Rendering Index is the measure of how accurately a light source renders the colour of items. The higher a light source’s CRI the more natural an object’s colour will appear.
With 100 being the value that represents a pure accuracy for how an object’s colour is rendered, LED strip and other light fittings are often presented with a CRI value of either >75, >80 or >90.
![]()
Lens Angle
Having the appropriate lens with your LED strip will help direct the light from your light source to exactly where you need it. This provides a more efficient use of the light from your LED Strip.

* The 120° cover is technically not a lens but comes as standard when lensing is not required, to provide the full range of light from the LED strip.
Lens Type
Choosing the correct lens type will diffuse the light source in a manner most appropriate for your application. A frosted or opaque lens will provide a much softer dispersion of light when compared to a clear lens. A frosted or opaque lens will also reduce the appearance of dots on a reflective surface.

An assortment of frosted, opaque and clear lenses and covers.
IP Rating
Ingress Protection Rating measures the degree of protection our LED strip has from external elements like dust and water. The first digit in an IP Rating measures the solid particle protection the light fitting has, such as fingers, screwdrivers, wires or dust. The second digit measures the liquid ingress protection a light fitting has. LED strip with an IP Rating of 20 is most common and would offer sufficient protection within an indoor environment. LED strip with an IP Rating of 65 or higher is generally considered to be water and dust resistant.
The table below outlines the levels of protection each number represents.
|
1st No. |
Protected Against |
2nd No. |
Protected Against |
|---|---|---|---|
|
0 |
No protection against contact and ingress of objects |
0 |
No protection against liquids |
|
1 |
Objects greater than 50mm. |
1 |
Vertically dripping water |
|
2 |
Objects greater than 12.5mm. |
2 |
Vertically dripping water when angled up to 15°. |
|
3 |
Objects greater than 2.5mm. |
3 |
Spraying water at any angle up to 60°. |
|
4 |
Objects greater than 1mm. |
4 |
Splashing water from any direction. |
|
5 |
Protection against dust. |
5 |
Jets of water from any direction. |
|
6 |
Dust tight. |
6 |
Powerful jets of water from any direction. |
|
7 |
Submersion in water up to 1m. for up to 30mins |
||
|
8 |
Submersion in water for long periods. |
Extrusion (Heat Sink)
The back bone of the LED strip is the Extrusion or Heat-Sink. This component draws heat away from the LED tape and typically extends the life of the LED strip. It also secures the strip in a straight line and makes it very easy to mount correctly. We generally use the three extrusion profiles shown below. When installing a strip that uses up to 10W/m we recommend the Z201. For higher wattages (up to 20W/m) we recommend the Z22W. For anything above 20W/m we recommend the SL30 or please contact us directly.
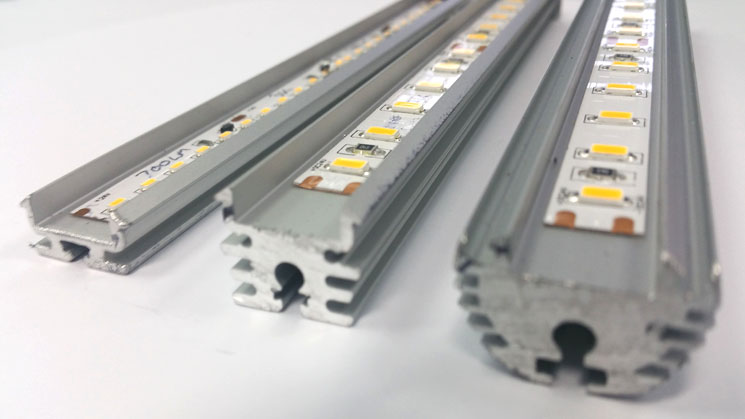
From Left: Z201, Z22 and SL30 extrusion (heatsink) for LED Strip.
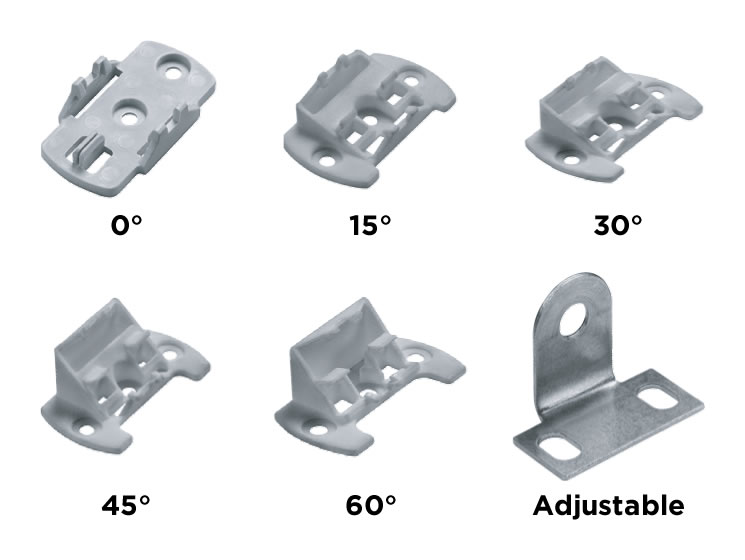
Mounting Brackets
You may need to adjust your LED strip to a particular angle to give the best lighting result. When searching for the right solution, angling your LED strip can make all the difference. Fixed angle brackets may come in varieties such as 0°, 15°, 30°, 45° and 60°. You could also use an adjustable mounting bracket, which allows for multiple mounting angles up to 180°.
Purchasing LED Strip
Everyone sells rolls of LED strip. What we do is different; we custom engineer the correct solution for your project. We select the required output, the required colour or colour temperature, then we select the correct LED with the correct extrusion, correct optics and the appropriate dimmed or non-dimmed power supply. Then we custom manufacture a complete solution to the length that is required for your installation.
If you would like more information on LED strip or would like Lightmoves to be a part of your project please feel free to contact us.
Contact